Firefly III is a very cool personal finance manager application. What really makes the application exceptional is its ability to be multi-user (where multiple users access the same set of bank accounts) and also multi-accounts (whereas you can run several different personal finances/businesses on the same installation.)
These instructions are based on the official documentation with edits so everything works with Virtualmin.
Let’s get started.
Preinstallation checklist:
- I’m using Debian 12, but you’re free to use a different flavor.
- Virtualmin should be installed as per the previous posts (going to assume you have installed the LAMP stack.)
- Docker & Portainer should also be installed.
If you don’t have all of these items completed go look at my previous posts.
First things first. Firefly is going to need 2 sub-domain names. The first is for the application itself. The second will be for the file/transaction importer.
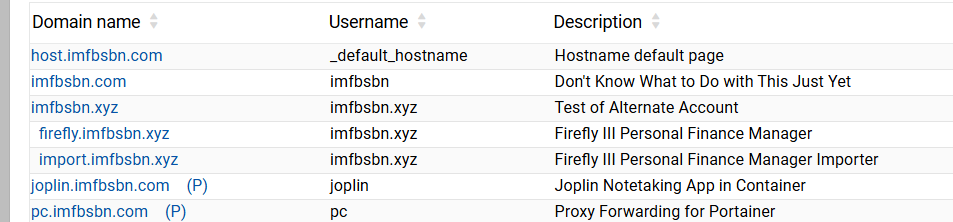
I’m going to continue to use the server from previous posts hosted by Server Cheap. This time we are going to create 2 sub-servers of an existing virtual server. Here’s the list of servers I currently have on this installation:
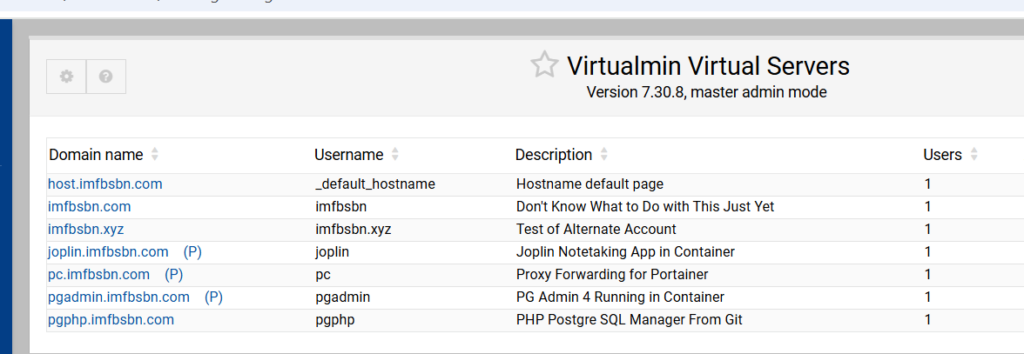
In order to create a sub-server we need to first select the server we want as the primary.
In this case I’m choosing the imfbsbn.xyz domain name. So I’m going to click on that.
From there were going to click on the Create Virtual Server link in the menu.
Then in the main window click on Sub-server as the new virtual server type.
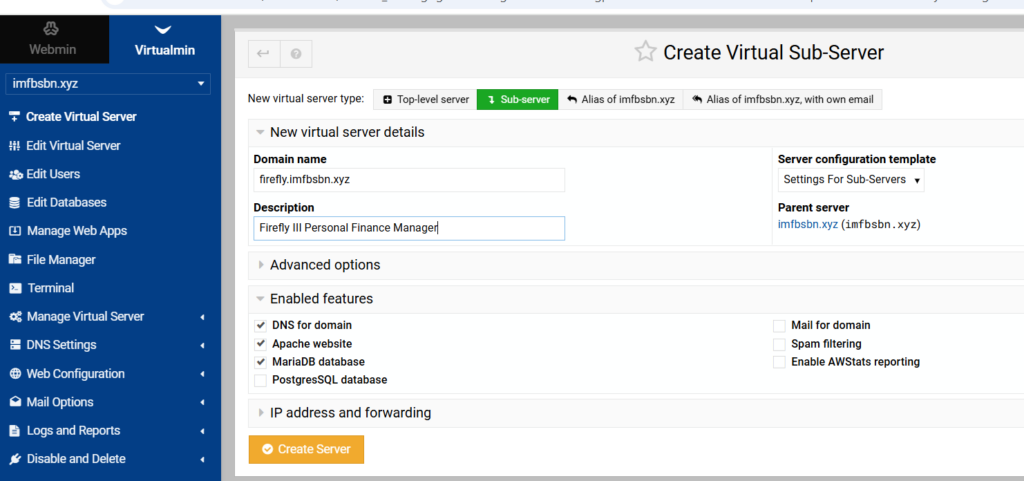
Enter the sub-domain name. And we won’t need all the features available. So uncheck the boxes for Postgres, mail, spam, & AWS.
Then go ahead and click the Create Server button.
While we are here – dealing with this domain – let’s go ahead and add the proxy.
In the left-hand menu click on “Web Configuration” then click on “Edit Proxy Website”.
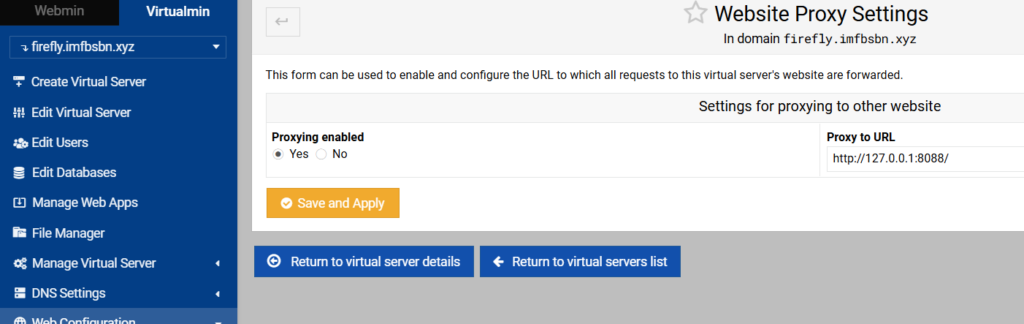
Enable proxying by clicking the appropriate radio button. Enter the proxy to URL as shown above. Then click on save and apply.
Next are going to create virtual server for the file importer.
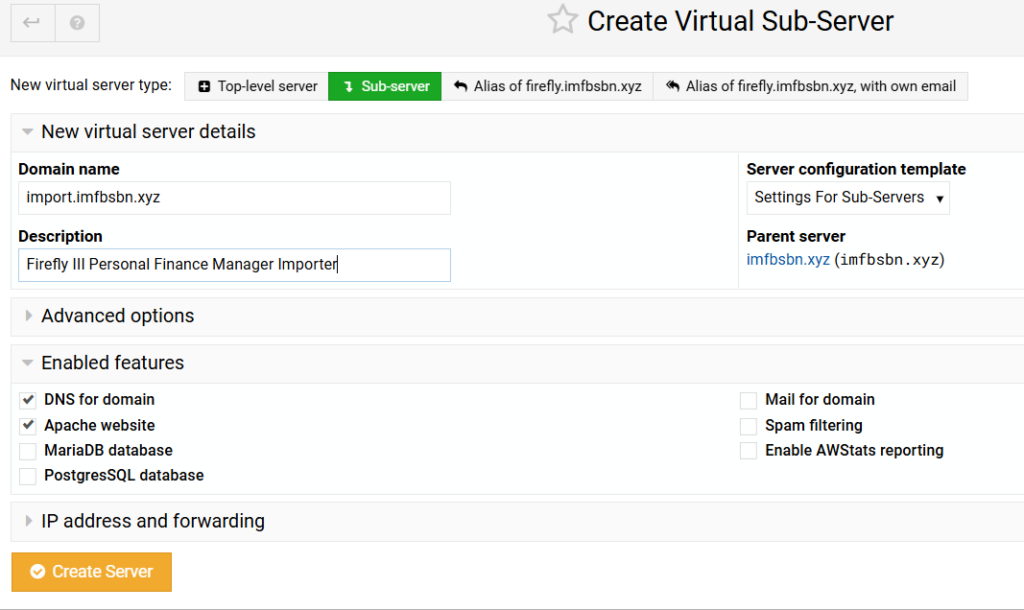
For this domain we will not be needing a MariaDB. So we can uncheck that box as well. Then create the server.
Again, we need to set up the reverse proxy for this domain.

Note that the port number is different for this domain.
Now when we look at our domain list, we will see the two domains we added as sub-domains.
A few more things to do within Virtualmin before moving on.
When we created the firefly.imfbsbn.xyz domain, Virtualmin automatically created a new Maria database called firefly.
Now we need to create a new MariaDB user and give that user permissions on the firefly database.
First click on the “Webmin” tab of the left side menu.
Then click to expand “Servers” & then MariaDB Database Server.
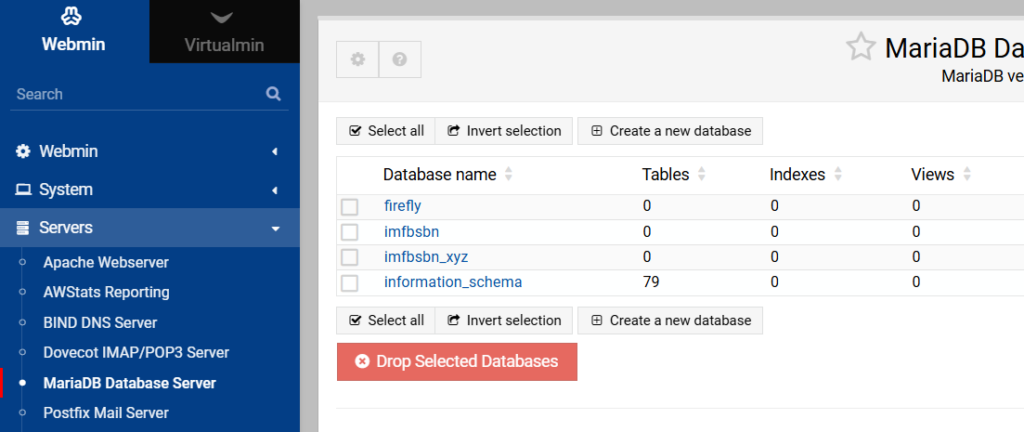
Here we can see the firefly database already exists.
On that page click the button labeled “User Permissions”.
Then click one of the “Create New User” buttons.
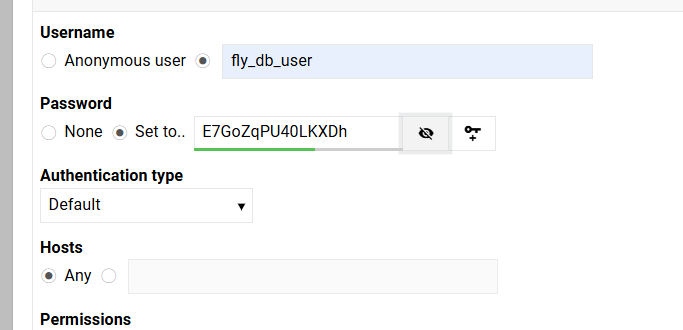
Create your own username. Be sure to set a robust password. And make sure that Hosts is set to “Any”.
Go-ahead and create the user.
Now we have to give that user permissions on the firefly database.
Within the MariaDB Database module, navigate to “Database Permissions”.
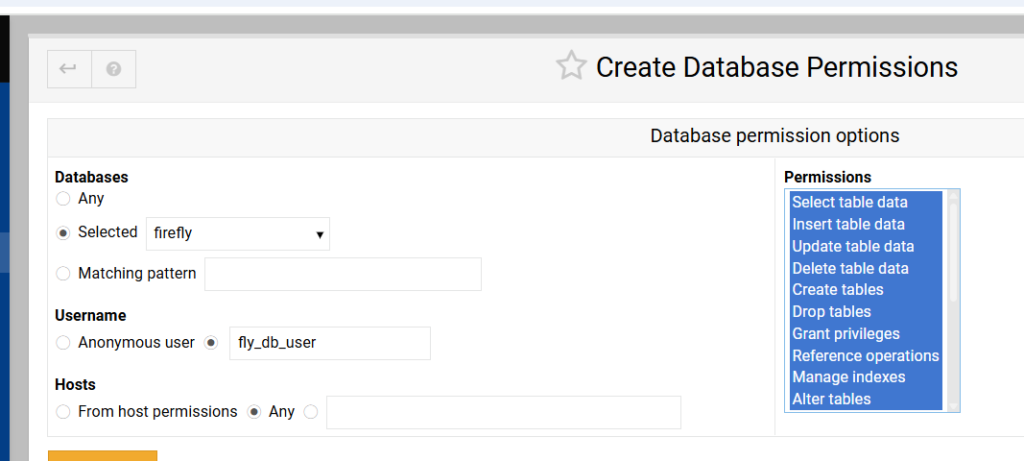
Choose the correct database. Enter the correct username. Make sure Hosts are Any. And go ahead and select everything in the permissions table.
Just one more thing to do within the MariaDB Virtualmin module. Click on the button labeled “MariaDB Server Configuration”.
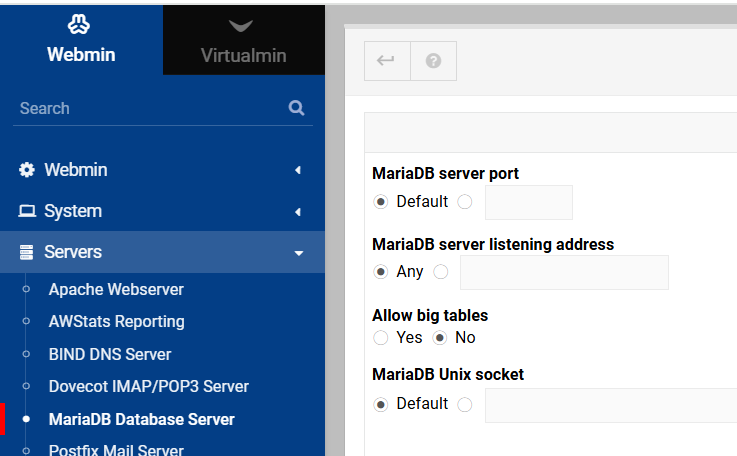
Make sure the MariaDB server listening address is sent to Any.
That’s enough within Virtualmin for right now. We will have to come back later and make a few more adjustments, but for now were going to move on.
Next we’re going to login to our Portainer installation and we are going to create a new stack.
I started with the docker compose and stack.env files provided in the official documentation. But I did have to make several changes.
- The official docker compose file calls for running the MariaDB inside the container. This is not an ideal situation while running Virtualmin. Virtualmin is already running MariaDB and will automatically backup the databases tied to virtual servers.
- The official docker compose file calls for running cron jobs from inside the container. We are going to set up cron jobs from within Virtualmin.
- As a result of connecting to the native OS database, we have to make some other changes as well.
Within Portainer click on your installation, then stacks, then the button to create new stack. Give your stack a name.
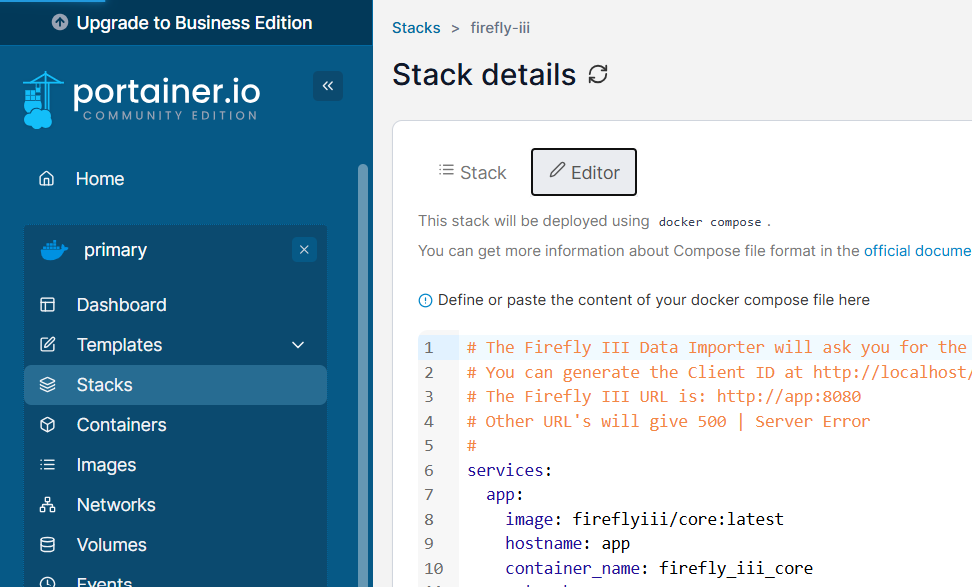
Here is the modified docker compose file:
#
# The Firefly III Data Importer will ask you for the Firefly III URL and a "Client ID".
# You can generate the Client ID at http://localhost/profile (after registering)
# The Firefly III URL is: http://app:8080
#
# Other URL's will give 500 | Server Error
#
services:
  app:
    image: fireflyiii/core:latest
    hostname: app
    container_name: firefly_iii_core
    networks:
      - firefly_iii
    restart: unless-stopped
    volumes:
      - /home/imfbsbn.xyz/domains/firefly.imfbsbn.xyz/upload:/var/www/html/storage/upload
###   you will want to modify the line above to match your domain's file location
###   the reason to do this is to make sure the firefly uploads get backed up by Virtualmin
    env_file: stack.env
    ports:
      - 8088:8080
  importer:
    image: fireflyiii/data-importer:latest
    hostname: importer
    restart: unless-stopped
    container_name: firefly_iii_importer
    networks:
      - firefly_iii
    ports:
      - 8090:8080
    depends_on:
      - app
    env_file: stack.env
networks:
  firefly_iii:
    driver: bridge
Don’t worry about environmental variables yet. Just go-ahead and deploy the container.
I don’t know why, but I was unable to get Firefly working using any environmental variables without first deploying the container with none.
Portainer will download the images, create the containers, and start the applications. You should get something like this:
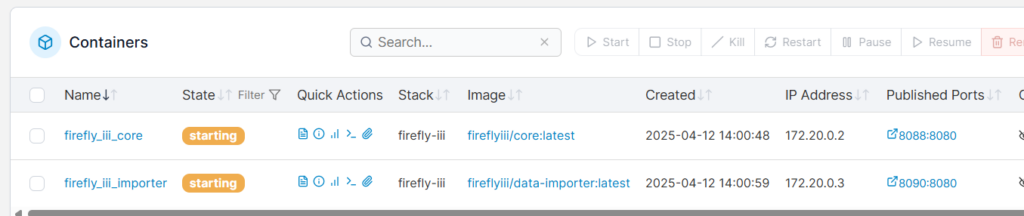
Take note of the IP address! Within docker the gateways for IP addresses (unless you have made some changes) will always be 0.1. So the gateway for our Firefly stack/containers is going to be 172.20.0.1. You are going to need to know that in just a minute.
At this point we should be able to check if the domains are correctly forwarding to the right containers.
And…

Now, that’s not what these pages are actually supposed to look like. We will have to make some changes later to the Apache directives. But for right now if you get pages like this everything is working so far.
Now go back to Portainer, and into the Firefly stack. Click on editor and scroll down to “Environmental Variables.”
This here is your stack.env file (if you switch the environmental variables into “advanced mode” you can cut-and-paste all of these at once.)
APP_ENV=production
APP_DEBUG=false
SITE_OWNER=mail@example.com
APP_KEY=sUHKRxr3g8BpTW2hkP6X4bMFDGeVZcav  ##you should change this to your own unique 32 character key
DEFAULT_LANGUAGE=en_US
DEFAULT_LOCALE=equal
TZ=America/Chicago  ## modify this as necessary
TRUSTED_PROXIES=**  ## this does not appear in the official documentation file but it is necessary
LOG_CHANNEL=stack
APP_LOG_LEVEL=notice
AUDIT_LOG_LEVEL=emergency
DB_CONNECTION=mysql
DB_HOST=172.23.0.1  ##make sure you enter the GATEWAY IP address of the containers/stack
DB_PORT=3306
DB_DATABASE=firefly  ## make sure this line, and the next two lines, match what you did in Virtualmin
DB_USERNAME=fly_db_user
DB_PASSWORD=E7GoZqPU40LKXDh
MYSQL_USE_SSL=false
MYSQL_SSL_VERIFY_SERVER_CERT=true
MYSQL_SSL_CAPATH=/etc/ssl/certs/
CACHE_DRIVER=file
SESSION_DRIVER=file
COOKIE_PATH="/"
COOKIE_DOMAIN=
COOKIE_SECURE=false
COOKIE_SAMESITE=lax
MAIL_MAILER=log
MAIL_HOST=null
MAIL_PORT=2525
MAIL_FROM=changeme@example.com
MAIL_USERNAME=null
MAIL_PASSWORD=null
MAIL_ENCRYPTION=null
MAIL_SENDMAIL_COMMAND=
SEND_ERROR_MESSAGE=true
SEND_REPORT_JOURNALS=true
ENABLE_EXTERNAL_MAP=false
ENABLE_EXCHANGE_RATES=false
ENABLE_EXTERNAL_RATES=false
MAP_DEFAULT_LAT=51.983333
MAP_DEFAULT_LONG=5.916667
MAP_DEFAULT_ZOOM=6
AUTHENTICATION_GUARD=web
AUTHENTICATION_GUARD_HEADER=REMOTE_USER
AUTHENTICATION_GUARD_EMAIL=
CUSTOM_LOGOUT_URL=
DISABLE_FRAME_HEADER=false
DISABLE_CSP_HEADER=false
ALLOW_WEBHOOKS=false
STATIC_CRON_TOKEN=
DKR_BUILD_LOCALE=false
DKR_CHECK_SQLITE=true
APP_NAME=FireflyIII
BROADCAST_DRIVER=log
QUEUE_DRIVER=sync
CACHE_PREFIX=firefly
USE_RUNNING_BALANCE=false
FIREFLY_III_LAYOUT=v1
QUERY_PARSER_IMPLEMENTATION=legacy
APP_URL=https://firefly.imfbsbn.xyz  ## change this to reflect your domain, note the https protocol
FIREFLY_III_URL=http://app:8080
VANITY_URL=https://firefly.imfbsbn.xyz  ## again
FIREFLY_III_ACCESS_TOKEN=
FIREFLY_III_CLIENT_ID=
USE_CACHE=true
IGNORE_DUPLICATE_ERRORS=false
IGNORE_NOT_FOUND_TRANSACTIONS=false
CAN_POST_AUTOIMPORT=false
CAN_POST_FILES=false
IMPORT_DIR_ALLOWLIST=
FALLBACK_IN_DIR=false
VERIFY_TLS_SECURITY=true
JSON_CONFIGURATION_DIR=
CONNECTION_TIMEOUT=31.41
LOG_RETURN_JSON=false
LOG_LEVEL=debug
ENABLE_MAIL_REPORT=false
EXPECT_SECURE_URL=false
MAIL_DESTINATION=noreply@example.com
MAIL_FROM_ADDRESS=noreply@example.com
POSTMARK_TOKEN=
QUEUE_CONNECTION=sync
SESSION_LIFETIME=120
IS_EXTERNAL=false
ASSET_URL=
MYSQL_RANDOM_ROOT_PASSWORD=yes
MYSQL_USER=fly_db_user  ## again – make sure these lines match what you have in Virtualmin
MYSQL_PASSWORD=E7GoZqPU40LKXDh
MYSQL_DATABASE=firefly
USE_PROXIES=127.0.0.1  ## this too is not included in the official documentation but needs to be added
Notice that the database credentials appear twice.
In order for our Firefly container to connect to our MariaDB running natively on the server, we need to point the application to the network gateway for these containers. In case you missed it above, within Portainer you can click on Networks and it will show you the IPv4 Gateway. In this case it is 172.20.0.1.
Delete everything after the ##’s and re-deploy the stack.
This would be a good time to check the container logs and look for errors. If everything went well we’re almost done.
Head back over into Virtualmin.
We need to edit the Apache directives for the sub-domains we created. There are (at least) two different ways to do this within Virtualmin.
The first is to select the appropriate domain within Virtualmin, then go to “Web Configuration”, and click on “Configure SSL Website”.
The other way is to start with Webmin, then click to expand “Servers”, click on “Apache Webserver”, and click on the appropriate virtual server.
However you get there, click on the “Edit Directives” block.
Change whatever you have within that window so that it looks more like below.
SuexecUserGroup #1007 #1007
ServerName firefly.imfbsbn.xyz
DocumentRoot /home/imfbsbn.xyz/domains/firefly.imfbsbn.xyz/public_html
ErrorLog /var/log/virtualmin/firefly.imfbsbn.xyz_error_log
CustomLog /var/log/virtualmin/firefly.imfbsbn.xyz_access_log combined
SSLEngine on
SSLCertificateFile /etc/ssl/virtualmin/17444589333674742/ssl.cert
SSLCertificateKeyFile /etc/ssl/virtualmin/17444589333674742/ssl.key
SSLProtocol all -SSLv2 -SSLv3 -TLSv1 -TLSv1.1
SSLCACertificateFile /etc/ssl/virtualmin/17444589333674742/ssl.ca
### the lines above should all be in there already – KEEP THEM!
### Actually proxy the traffic and really the only important part ###
AllowEncodedSlashes On
RewriteEngine On
SetEnvIf Cookie "(^|;\ *)csrftoken=([^;\ ]+)" csrftoken=$2
RequestHeader set  X-CSRFToken "%{csrftoken}e"
### Proxy Websockets Section 1 (works for me) ###
RewriteCond %{HTTP:UPGRADE} ^WebSocket$ [NC]
RewriteCond %{HTTP:CONNECTION} Upgrade$ [NC]
RewriteRule ^/?(.*) "ws://127.0.0.1:8088/$1" [P,L]
### Proxy everything else ###
ProxyPass / http://127.0.0.1:8088/ connectiontimeout=6 timeout=60
ProxyPassReverse / http://127.0.0.1:8088/
ProxyPreserveHost On
ProxyRequests Off
RequestHeader set X-Forwarded-Proto expr=%{REQUEST_SCHEME}
RequestHeader set X-Forwarded-SSL expr=%{HTTPS}
After you’ve made your changes, click on Save and Close.
When Virtualmin tries to apply the changes you may get an error like this.
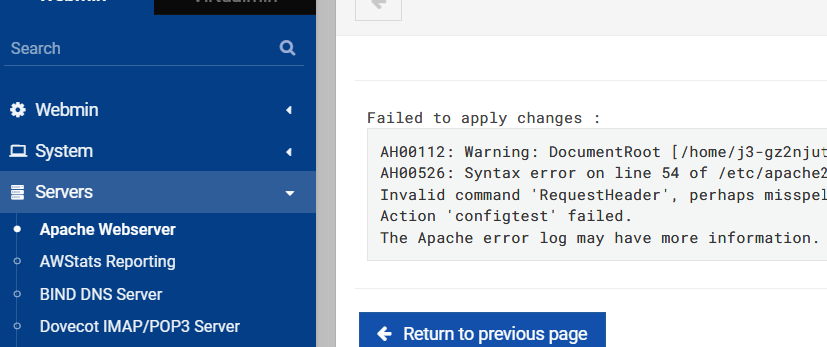
To correct this, from the Webmin menu select Servers then Apache Webserver.
Click on Global Configuration tab. Then click the button marked “Configure Apache Modules”.
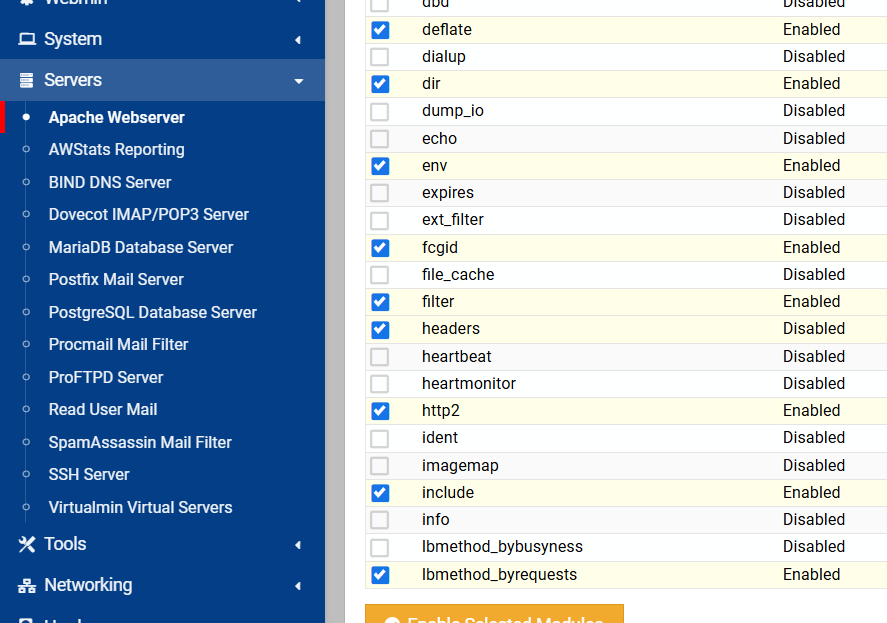
Select the headers checkbox and click the Enable Selected Modules button.
*** On the next page that loads, you have to click on Apply Changes. ***
Now you have to make the same changes to the Apache directives for the “import” domain name. You will do that exactly the same way as you did above. Just pay special attention to the fact that the domain name is a little different and that the port number is now 8090.
Once you have made those changes, visit the URLs, and the pages should load correctly (they will look different than they did before, more professional.)
That’s it! You have successfully installed Firefly III. And if you have Virtualmin backing up your system on a schedule, Firefly will get back-up automatically.
– – – – –
Last thing to do is to set up the cron job.
Head into Portainer, Stacks, Firefly stack, & editor. Pop open Environmental Variables and enter a 32 (exactly 32) character key in the STATIC_CRON_TOKEN field.

Now you have to add that token to the end of this URL like so:
https://firefly.imfbsbn.xyz/api/v1/cron/z7xGE4y5SsM8jPWkYgZFQ62vBRnCUTtrWithin Virtualmin, switch over to Webmin. Then click on Servers and then Scheduled Cron Jobs.
Now you want to click on Manually Edit Cron Jobs.
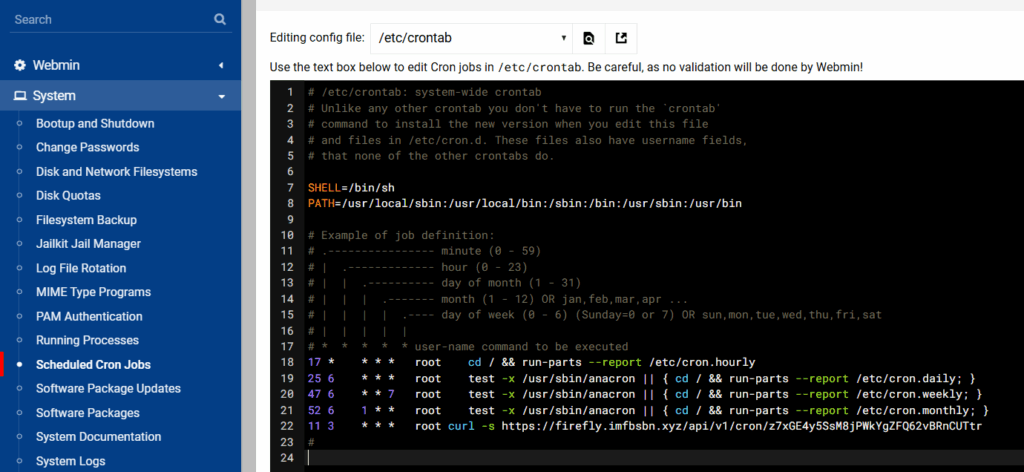
Add the line below so that the URL will be loaded every day at 3:11.
11 3 * * * root curl -s https://firefly.imfbsbn.xyz/api/v1/cron/z7xGE4y5SsM8jPWkYgZFQ62vBRnCUTtrSave and close. And you’re done.
– – – – –
One more thing before you go. Connecting the import module to the core is not well described in the official documentation. So let’s walk through that really quick.
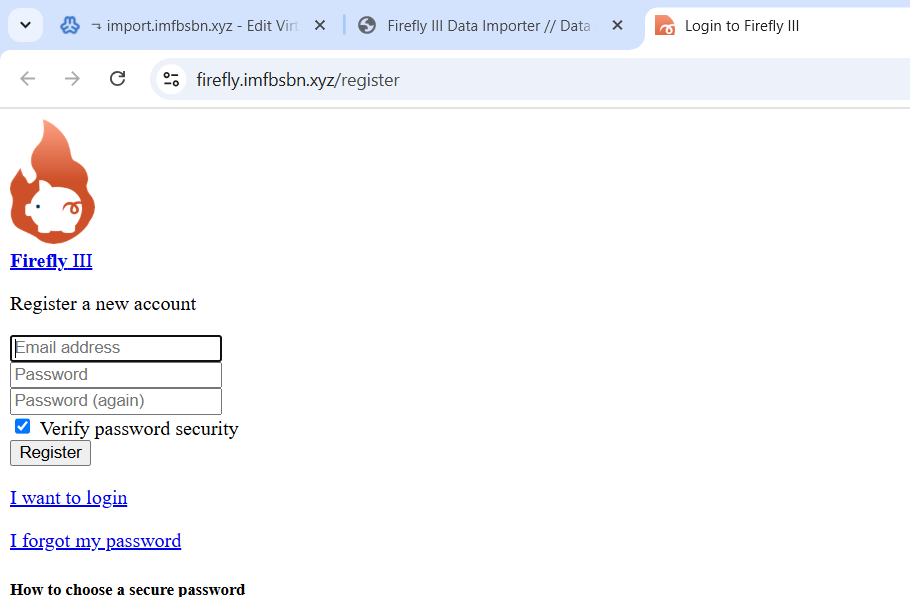
Visit the main page and go through the registration process. Go ahead and create an account, and go through the tips.
When that’s all done go to the address bar and visit the /profile page.
On that page click on the OAuth tab, and then create a new OAuth client.

Go-ahead and click on the create button.
The system will then give you a page where there is a list of clients. You need the number under Client ID.
Now go to the URL for the file importer. Enter the number for the Client ID you just located.
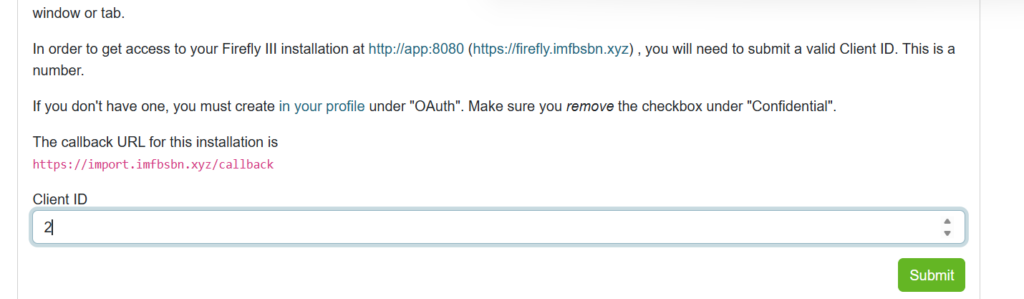
First are going to click the submit button.
And on the next page you want to click on the authorize button.
Congratulations! Now you can upload files into your Firefly III installation.
[/et_pb_text][/et_pb_column][/et_pb_row][/et_pb_section]