In the last post we got Nextcloud AIO up and running. Here we are going to cover how to make sure your installation stays up-to-date and has off-site backups.
Thankfully Nextcloud AIO makes all this extremely easy. But we will need to create a few cron jobs in Virtualmin as well. No big deal; this will only take a few minutes.
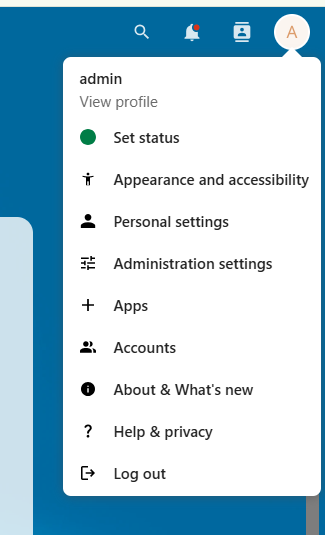
Start by logging in to Nextcloud. Click on the circle at the top right to open up the menu.
From here click on Administration settings. Which will take you here:
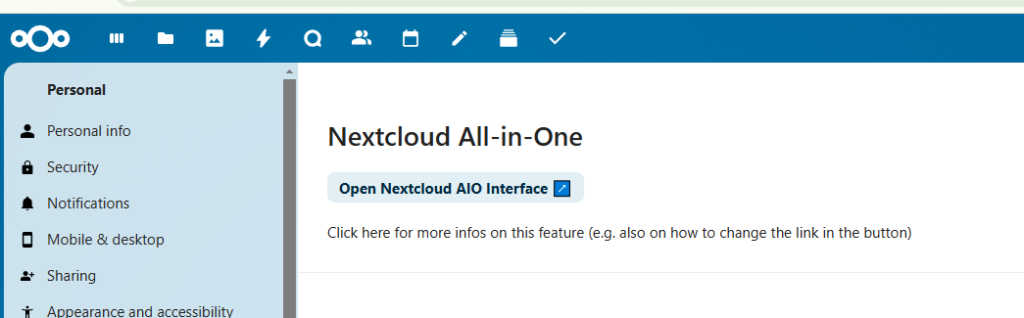
Click on that button. The Open Nextcloud AIO Interface button.
Just like it says, it will open the Nextcloud AIO interface.
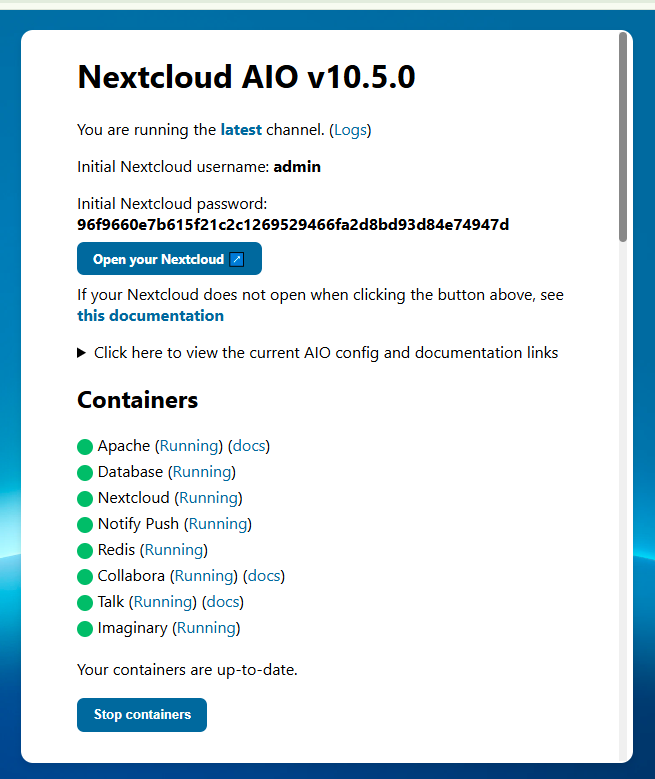
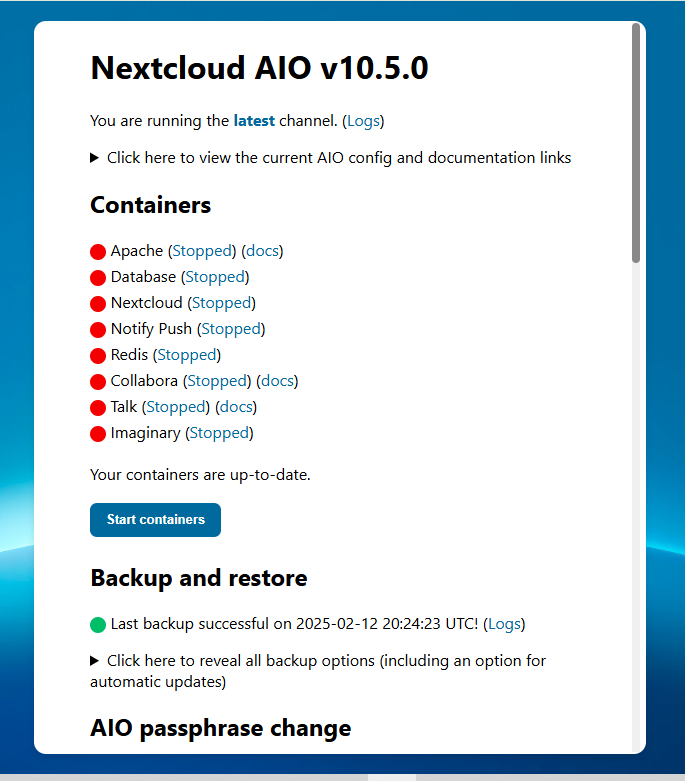
You want to scroll down on that page until you get to the backup section.
Okay – now we need to cover a few things before moving on.
I have been running the backup “my way” since before they added additional options. So today, options exist that did not exist several months ago.
In the olden days, the backup location was /mnt/backup. That was it. You did not get an option. Also (in the olden days) the option to use a remote Borg repo did not exist.
In theory you should be able to change the local location to something like /home/nextuser/backup and Virtualmin would automatically backup the folder. However, you may run into a problem with folder/file permissions as the files created by Nextcloud will be owned by root and not nextuser.
Also in theory, you can use a remote Borg repo as your off-site storage. But “my way” uses S3 object storage which is much cheaper than volume storage.
For these reasons – and because I know that my system works – I’m going to continue to show you how I do it. (Dear experts/pros/gurus: I’m not saying this is the best way. I’m saying this is “a way” that I happen to know works because I have had to restore the system from a backup done this way.)
So in the local backup location field go ahead and enter: /mnt/backup just like in the image above and click the Submit Backup Location button.
The page will reload and if you scroll down you will see your backup encryption key. You don’t need to write that down. It will always be able to get it off of this page.
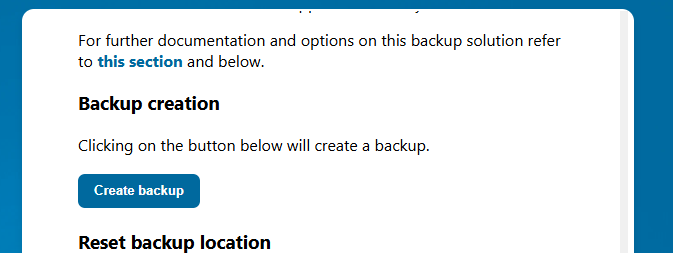
Keep scrolling down until you get to the Create Backup button.
Go ahead and click that.
Let the system do its thing. Nextcloud is going to stop all of the containers and run the backup container. If you want to watch this, you can login to Portainer and see what is running. The first backup always takes a few extra minutes; so be patient.
When finished you should get a screen like this:
The system leaves you with ALL CONTAINERS STOPPED.
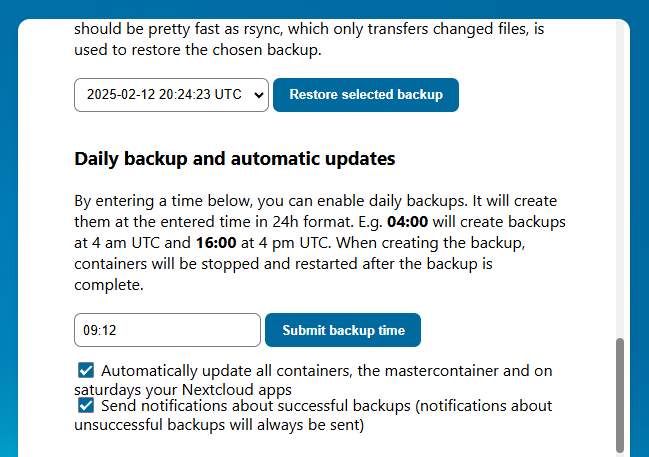
Underneath “backup and restore” there is the spot the arrow that says “click here to reveal all backup options”. Go ahead and do that. Click on that sentence to reveal more options. Then scroll down on that page until you get to here:
When you submit a backup time, you need to think a little bit. Whatever time you put in the box will be UTC. When it’s 09:00 UTC that is either 04:00 or 05:00 in New York (depending on DST.) While the backup is running the containers will be stopped and your users unable to access the system. So choose your time wisely for your particular time zone.
Also, the system is running other cron jobs all the time. So I try not to deliberately schedule things at the top or bottom of the hour. I entered 12 minutes after the hour.
One of the beautiful things about Nextcloud AIO is its ability to take care of itself. Make sure that first checkbox is checked and every Saturday the system will update everything in addition to performing the backup.
Once you’ve selected your time go ahead and click the Submit Backup Time button.
And don’t forget to START YOUR CONTAINERS.
We are done in Nextcloud. We know that our server will be backed up every day at either 4 or 5AM New York time.
All that’s left is to make sure the backup files get stored into the cloud. For that we will use Virtualmin.
Go ahead and log into your Virtualmin panel/portal.
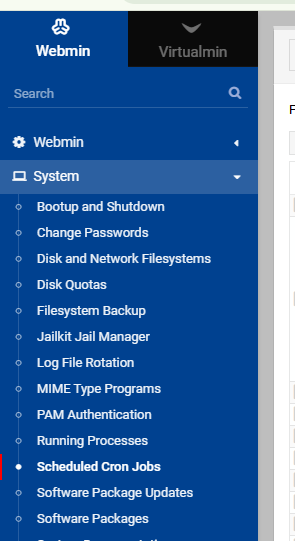
Click on “Webmin” at the top left (or press Alt-W.)
Then click on System. Then click on Scheduled Cron Jobs.
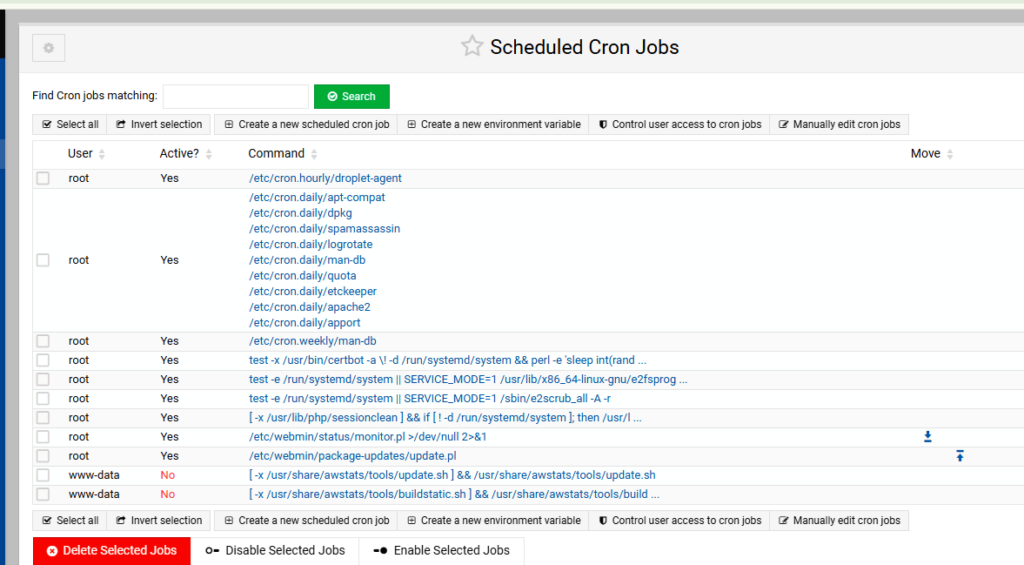
Should get something like this:
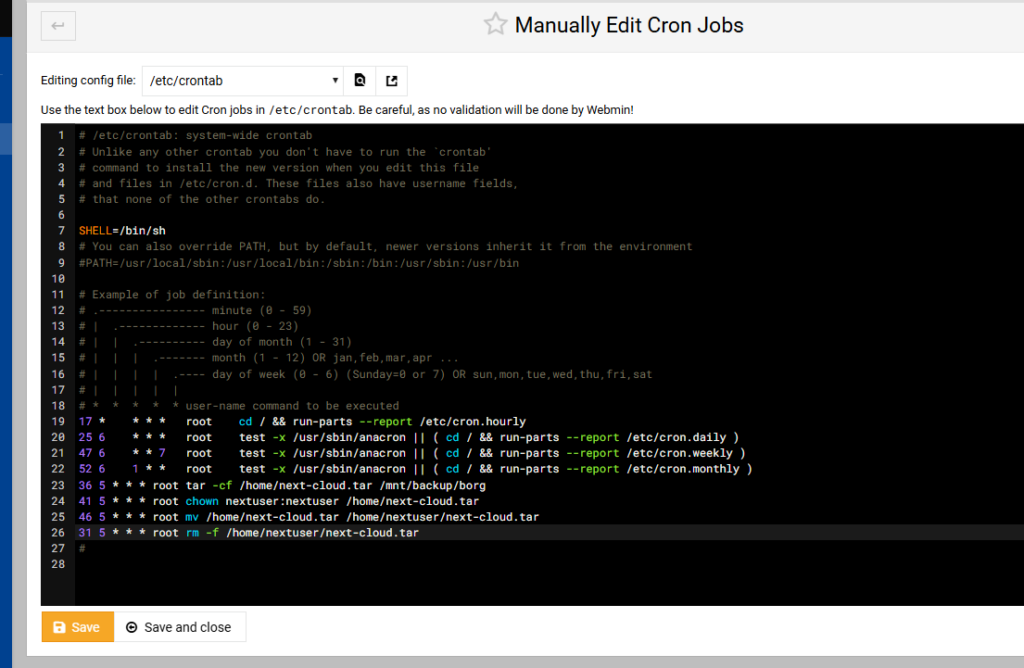
Click on either of the buttons that say “Manually edit cron jobs”.
To the bottom of that file we want to add the following lines:
Every day at 5:36 root is going to create a tar archive of the backup directory.
Every day at 5:41 root is going to change the owner of that file to nextuser.
Every day at 5:46 root is going to move the backup file into nextuser’s directory so it can be backed up by Virtualmin.
The next morning… Every day at 5:31 root is going to delete yesterday’s file so the process can start over.
With these lines added, your file might look something like this:
NOTE: I understand the “pros” will tell me that this could be done with a single command and a Perl script. If you want to research doing that be my guest.
Provided you have already scheduled daily backups Virtualmin will now backup that tar archive file to your S3 object storage in the cloud every day.
Of course there are other ways to do this. But this way has been working well for over a year without issue.
This is going to be the easiest complex thing you have ever done.
Nextcloud is kinda like Dropbox meets Zoom and Google Office. You should probably check out the official website.
Nextcloud AIO is now (wasn’t until recently) the official method to install the open-source, free, community version of Nextcloud. Installing Nextcloud AIO has several advantages over installing only Nextcloud. The AIO version includes automated installation, updates, & backups. It also comes with STUN & TURN servers, and the “high-performance backend” for Talk (Nextcloud’s version of Zoom.)
The bottom line is that Virtualmin + Docker + Portainer + Nextcloud AIO = Awesomeness!
So let’s have at it.
As with all of these examples, the first thing we need is a fully qualified domain name, a URL, where we are going to host Nextcloud. In this example were going to use: nextcloud.imfbsbn.com.
If you read the previous post about how I setup Virtualmin, you will know that I do not use the DNS features within VM. Just so were clear, VM provides DNS services beautifully. My reasons for not using VM’s DNS has nothing to do with VM. My reasoning is that my domain registrar – a multi-multimillion dollar organization – can provide DNS more reliably than the VPS server I rent for $12/mo.
So here you have a choice:
If VM is hosting your DNS – if you followed the official setup instructions – then all you have to do is add the domain to VM.
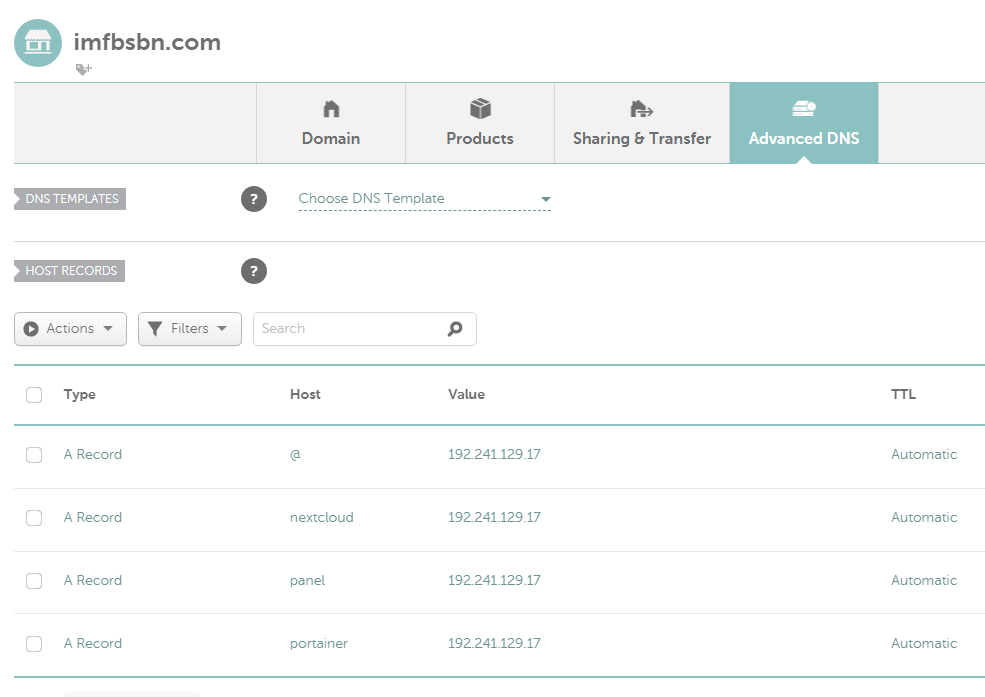
If you’re like me, and VM is NOT hosting your DNS, then you have to create your DNS record at your domain registrar. This is me. So this is what I’m going to do first.
I’m going to create the Nextcloud DNS record which looks like this:
Again, this is what it looks like at Namecheap. Things at your registrar may appear different. Also, you can see the records I’ve created in previous projects.
Next, we need to add the domain name to Virtualmin and set up the reverse proxy. Virtualmin makes this super easy.
Log into the Virtualmin panel,
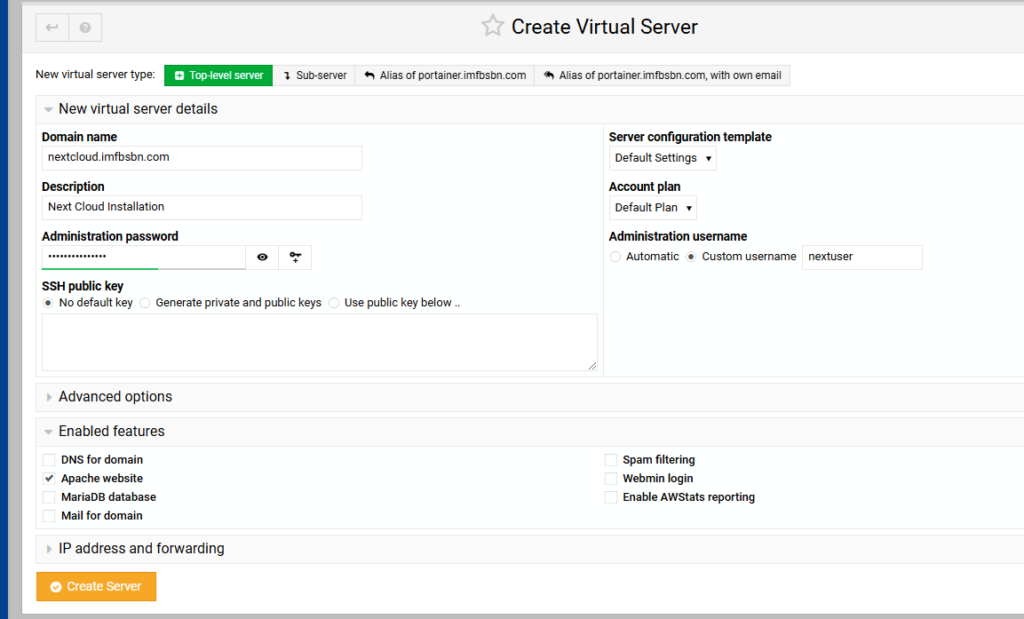
Near the top left of the menu, click on “Create Virtual Server”.
Quick note on “top-Level” & “Sub-Servers”
Top-Level Servers | You can think of these like an account. If you and three friends each own five domains and you wanted to share a server the root account would create four “Top-Level” servers; one for each friend. Each person would be able to login to Virtualmin and be the administrator for their account and whatever “Sub- Servers” (a.k.a. domains) they wish to add.
Because I’m the only “admin” with access to my server, I’m always logging in as root. I want to have access to all of the domains hosted on the server at all times. I don’t want to have to log out, and login as a different user to make changes to any particular domain. Therefore I generally add all domains to my server as “Top-Level Servers.”
Just like we added the domain for portainer, we will add this domain for nextcloud.
For domain name we will enter our fully qualified domain name. Description can be anything you want.
As for the administration password, I just clicked on the little key with the + sign and VM inserted a password for me. I didn’t write it down because I’m the only user of the system and I will always be logging in as root. In fact, I don’t need to write down either the username or the password. We will never use them.
Just like before, a few changes to the default settings:
For the administration username I prefer to use something custom over the automatic feature.
I unchecked the boxes for DNS, MariaDB, Mail, Spam, Webmin, & AWStats because this domain will not use any of those features.
This domain WILL REQUIRE Apache (as a reverse proxy.) So leave that box checked.
When you’re all set click the orange Create Server button.
Virtualmin will work its magic adding the domain to the server. Depending on your hardware the process might take 1-2 minutes.
When it’s done, click on the blue button at the bottom that says Return to Server Details.
Before we leave the Virtualmin panel, we’re going to set up the proxy forwarding (so we don’t have to come back later.)
Confirm VM is ready to modify the correct domain. It should be listed at the top of the left menubar.
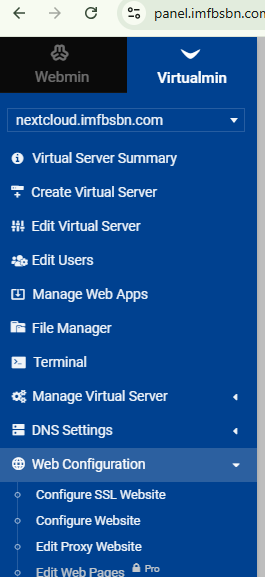
First click on Web Configuration. Then click on Edit Proxy Website.
Click on the “Yes” radio button to enable proxying.
Inside the Proxy to URL box enter: http://127.0.0.1:11100/
Click on Save and Apply. And we have done everything we need to do inside Virtualmin.
Assuming you have installed Portainer – as shown in the previous post – you don’t even need to access the CLI in order to complete the installation.
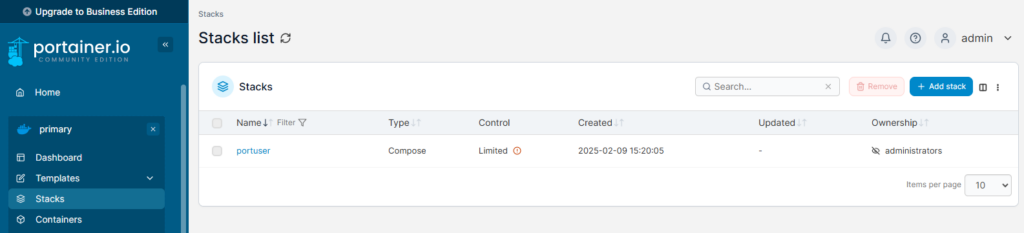
Instead, log into Portainer, click on the “primary” installation, and then click on “stacks”.
Over near the top right, click on the Add Stack button.
Give your stack a name. Be aware and must meet Linux standards for usernames. The system will bark at you if it’s unhappy.
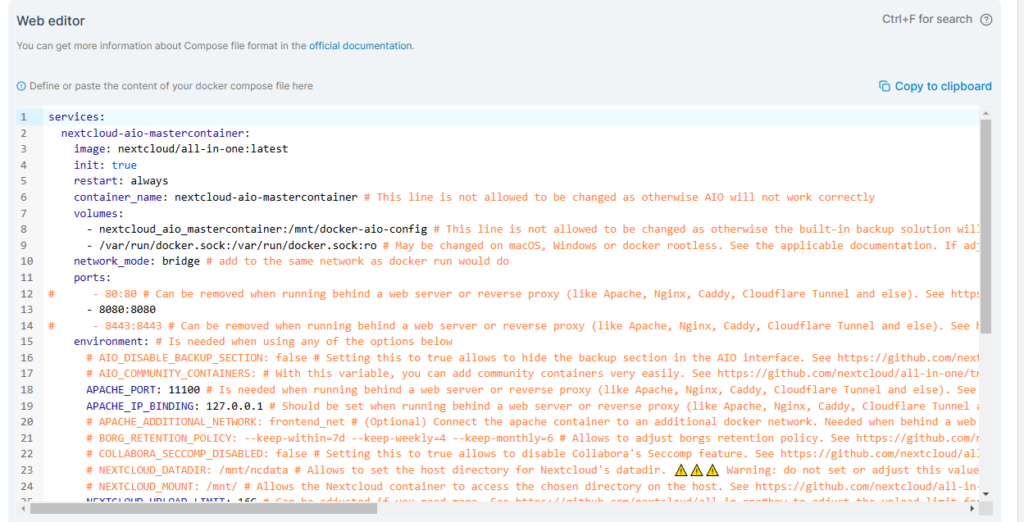
The “web editor” is selected by default. That’s what were going to use.
Then you’re going to copy and paste the following code into the window.
services:
nextcloud-aio-mastercontainer:
image: nextcloud/all-in-one:latest
init: true
restart: always
container_name: nextcloud-aio-mastercontainer # This line is not allowed to be changed as otherwise AIO will not work correctly
volumes:
- nextcloud_aio_mastercontainer:/mnt/docker-aio-config # This line is not allowed to be changed as otherwise the built-in backup solution will not work
- /var/run/docker.sock:/var/run/docker.sock:ro # May be changed on macOS, Windows or docker rootless. See the applicable documentation. If adjusting, don't forget to also set 'WATCHTOWER_DOCKER_SOCKET_PATH'!
network_mode: bridge # add to the same network as docker run would do
ports:
# - 80:80 # Can be removed when running behind a web server or reverse proxy (like Apache, Nginx, Caddy, Cloudflare Tunnel and else). See https://github.com/nextcloud/all-in-one/blob/main/reverse-proxy.md
- 8080:8080
# - 8443:8443 # Can be removed when running behind a web server or reverse proxy (like Apache, Nginx, Caddy, Cloudflare Tunnel and else). See https://github.com/nextcloud/all-in-one/blob/main/reverse-proxy.md
environment: # Is needed when using any of the options below
# AIO_DISABLE_BACKUP_SECTION: false # Setting this to true allows to hide the backup section in the AIO interface. See https://github.com/nextcloud/all-in-one#how-to-disable-the-backup-section
# AIO_COMMUNITY_CONTAINERS: # With this variable, you can add community containers very easily. See https://github.com/nextcloud/all-in-one/tree/main/community-containers#community-containers
APACHE_PORT: 11100 # Is needed when running behind a web server or reverse proxy (like Apache, Nginx, Caddy, Cloudflare Tunnel and else). See https://github.com/nextcloud/all-in-one/blob/main/reverse-proxy.md
APACHE_IP_BINDING: 127.0.0.1 # Should be set when running behind a web server or reverse proxy (like Apache, Nginx, Caddy, Cloudflare Tunnel and else) that is running on the same host. See https://github.com/nextcloud/all-in-one/blob/main/reverse-proxy.md
# APACHE_ADDITIONAL_NETWORK: frontend_net # (Optional) Connect the apache container to an additional docker network. Needed when behind a web server or reverse proxy (like Apache, Nginx, Caddy, Cloudflare Tunnel and else) running in a different docker network on same server. See https://github.com/nextcloud/all-in-one/blob/main/reverse-proxy.md
# BORG_RETENTION_POLICY: --keep-within=7d --keep-weekly=4 --keep-monthly=6 # Allows to adjust borgs retention policy. See https://github.com/nextcloud/all-in-one#how-to-adjust-borgs-retention-policy
# COLLABORA_SECCOMP_DISABLED: false # Setting this to true allows to disable Collabora's Seccomp feature. See https://github.com/nextcloud/all-in-one#how-to-disable-collaboras-seccomp-feature
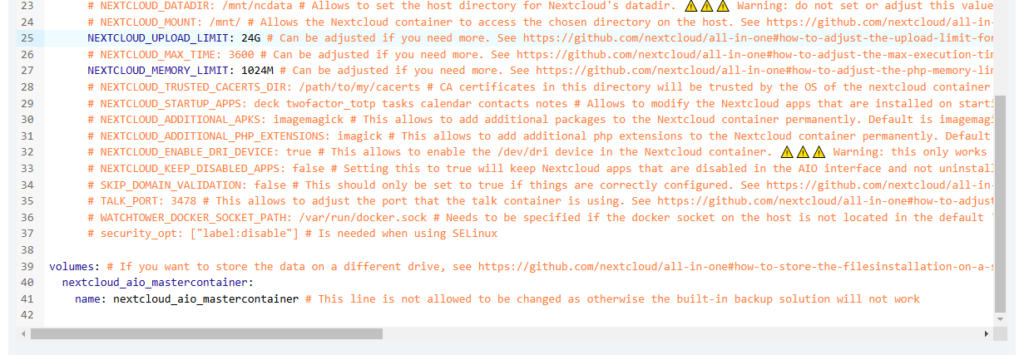
# NEXTCLOUD_DATADIR: /mnt/ncdata # Allows to set the host directory for Nextcloud's datadir. ⚠️⚠️⚠️ Warning: do not set or adjust this value after the initial Nextcloud installation is done! See https://github.com/nextcloud/all-in-one#how-to-change-the-default-location-of-nextclouds-datadir
# NEXTCLOUD_MOUNT: /mnt/ # Allows the Nextcloud container to access the chosen directory on the host. See https://github.com/nextcloud/all-in-one#how-to-allow-the-nextcloud-container-to-access-directories-on-the-host
NEXTCLOUD_UPLOAD_LIMIT: 24G # Can be adjusted if you need more. See https://github.com/nextcloud/all-in-one#how-to-adjust-the-upload-limit-for-nextcloud
# NEXTCLOUD_MAX_TIME: 3600 # Can be adjusted if you need more. See https://github.com/nextcloud/all-in-one#how-to-adjust-the-max-execution-time-for-nextcloud
NEXTCLOUD_MEMORY_LIMIT: 1024M # Can be adjusted if you need more. See https://github.com/nextcloud/all-in-one#how-to-adjust-the-php-memory-limit-for-nextcloud
# NEXTCLOUD_TRUSTED_CACERTS_DIR: /path/to/my/cacerts # CA certificates in this directory will be trusted by the OS of the nextcloud container (Useful e.g. for LDAPS) See https://github.com/nextcloud/all-in-one#how-to-trust-user-defined-certification-authorities-ca
# NEXTCLOUD_STARTUP_APPS: deck twofactor_totp tasks calendar contacts notes # Allows to modify the Nextcloud apps that are installed on starting AIO the first time. See https://github.com/nextcloud/all-in-one#how-to-change-the-nextcloud-apps-that-are-installed-on-the-first-startup
# NEXTCLOUD_ADDITIONAL_APKS: imagemagick # This allows to add additional packages to the Nextcloud container permanently. Default is imagemagick but can be overwritten by modifying this value. See https://github.com/nextcloud/all-in-one#how-to-add-os-packages-permanently-to-the-nextcloud-container
# NEXTCLOUD_ADDITIONAL_PHP_EXTENSIONS: imagick # This allows to add additional php extensions to the Nextcloud container permanently. Default is imagick but can be overwritten by modifying this value. See https://github.com/nextcloud/all-in-one#how-to-add-php-extensions-permanently-to-the-nextcloud-container
# NEXTCLOUD_ENABLE_DRI_DEVICE: true # This allows to enable the /dev/dri device for containers that profit from it. ⚠️⚠️⚠️ Warning: this only works if the '/dev/dri' device is present on the host! If it should not exist on your host, don't set this to true as otherwise the Nextcloud container will fail to start! See https://github.com/nextcloud/all-in-one#how-to-enable-hardware-acceleration-for-nextcloud
# NEXTCLOUD_ENABLE_NVIDIA_GPU: true # This allows to enable the NVIDIA runtime and GPU access for containers that profit from it. ⚠️⚠️⚠️ Warning: this only works if an NVIDIA gpu is installed on the server. See https://github.com/nextcloud/all-in-one#how-to-enable-hardware-acceleration-for-nextcloud.
# NEXTCLOUD_KEEP_DISABLED_APPS: false # Setting this to true will keep Nextcloud apps that are disabled in the AIO interface and not uninstall them if they should be installed. See https://github.com/nextcloud/all-in-one#how-to-keep-disabled-apps
# SKIP_DOMAIN_VALIDATION: false # This should only be set to true if things are correctly configured. See https://github.com/nextcloud/all-in-one?tab=readme-ov-file#how-to-skip-the-domain-validation
# TALK_PORT: 3478 # This allows to adjust the port that the talk container is using which is exposed on the host. See https://github.com/nextcloud/all-in-one#how-to-adjust-the-talk-port
# WATCHTOWER_DOCKER_SOCKET_PATH: /var/run/docker.sock # Needs to be specified if the docker socket on the host is not located in the default '/var/run/docker.sock'. Otherwise mastercontainer updates will fail. For macos it needs to be '/var/run/docker.sock'
# security_opt: ["label:disable"] # Is needed when using SELinux
# # Optional: Caddy reverse proxy. See https://github.com/nextcloud/all-in-one/discussions/575
# # Alternatively, use Tailscale if you don't have a domain yet. See https://github.com/nextcloud/all-in-one/discussions/5439
# # Hint: You need to uncomment APACHE_PORT: 11000 above, adjust cloud.example.com to your domain and uncomment the necessary docker volumes at the bottom of this file in order to make it work
# # You can find further examples here: https://github.com/nextcloud/all-in-one/discussions/588
# caddy:
# image: caddy:alpine
# restart: always
# container_name: caddy
# volumes:
# - caddy_certs:/certs
# - caddy_config:/config
# - caddy_data:/data
# - caddy_sites:/srv
# network_mode: "host"
# configs:
# - source: Caddyfile
# target: /etc/caddy/Caddyfile
# configs:
# Caddyfile:
# content: |
# # Adjust cloud.example.com to your domain below
# https://cloud.example.com:443 {
# reverse_proxy localhost:11000
# }
volumes: # If you want to store the data on a different drive, see https://github.com/nextcloud/all-in-one#how-to-store-the-filesinstallation-on-a-separate-drive
nextcloud_aio_mastercontainer:
name: nextcloud_aio_mastercontainer # This line is not allowed to be changed as otherwise the built-in backup solution will not work
# caddy_certs:
# caddy_config:
# caddy_data:
# caddy_sites:
Sorry it looks so terrible in WordPress. In the editor it should look better; something like this:
Comment out the line with port 80. We will be using a reverse proxy.
Comment out the line with port 8443. Again, we will be using the reverse proxy.
In the original file they use Apache_port 11000. That conflicts with Virtualmin’s email spam filter. So change this port to 11100 and things will work better.
Because we will be using Apache as a reverse proxy, we need to set Apache_IP_binding as shown.
Lastly, I upped the upload limit and the memory limit as shown below.
Everything else is left the same. But feel free to make any changes you deem necessary.
Then, scroll down on the page and click on the Deploy the Stack button.
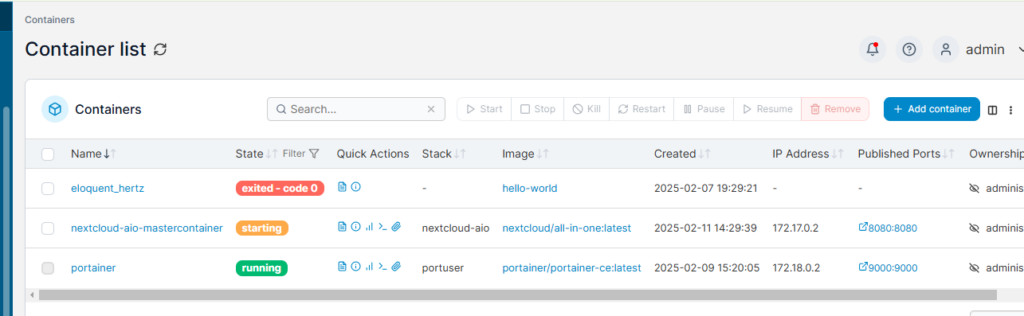
Once deployed, navigate over to the Containers page which will look like this:
When the orange “starting” turns green you will be able to navigate to the IP address of your machine at port 8080.
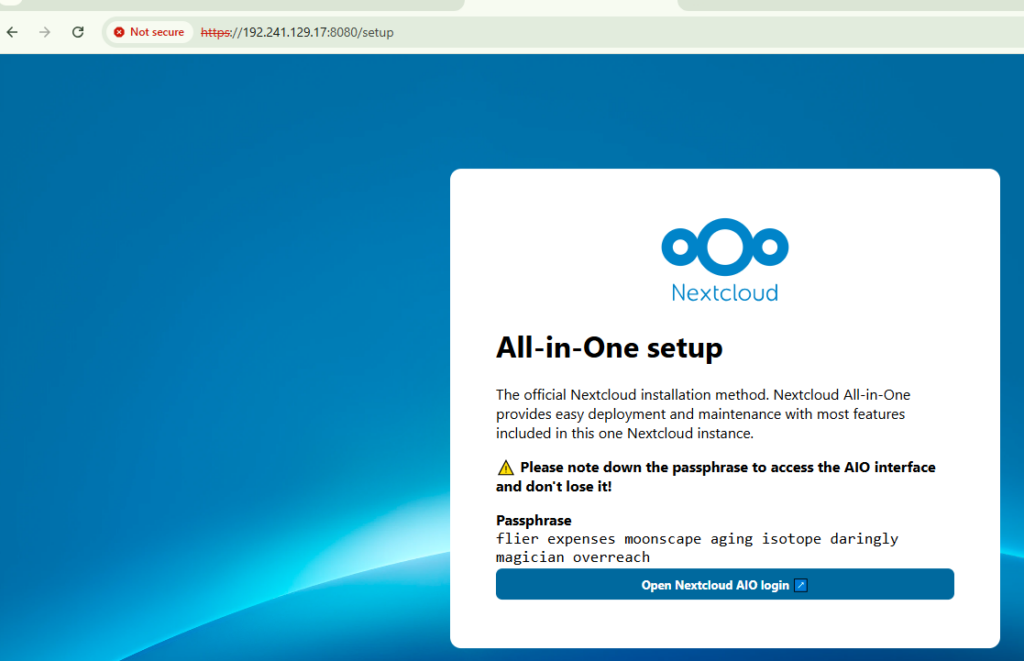
In our case, were going to use the IP address of the server built at Digital Ocean: https://192.241.129.17:8080/
You should get a screen like this:
Make sure you save that passphrase in a safe place, then click on the open button.
Enter the passphrase and login.
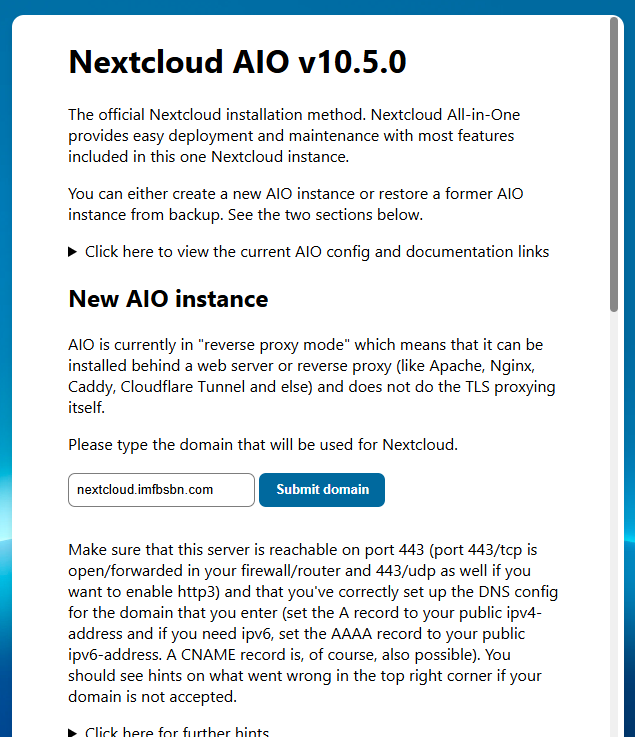
Here you want to enter the domain – not the URL – just the fully qualified domain name that you added to Virtualmin.
Go ahead and click on the Submit Domain button.
If everything goes well, the domain will check out. Meaning that the DNS records are correct and the domain is reachable on port 443.
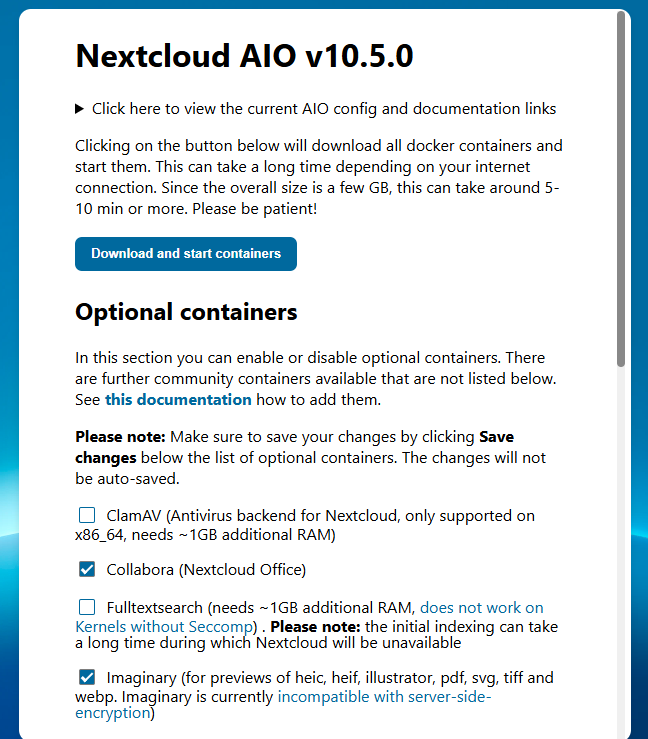
On the next screen you can choose optional containers to install, and also change the time zone.
On this installation I’m electing to go with the default options. So I just click on the Download and start Containers button.
… This is gonna take a little while. Find yourself a refreshing beverage and relax.
When it’s all done you will get a screen like this:
You’re going to want to save that password someplace safe.
Go ahead and click on the Open your Nextcloud button to login. The default administrative user is “admin” and the password is right there.
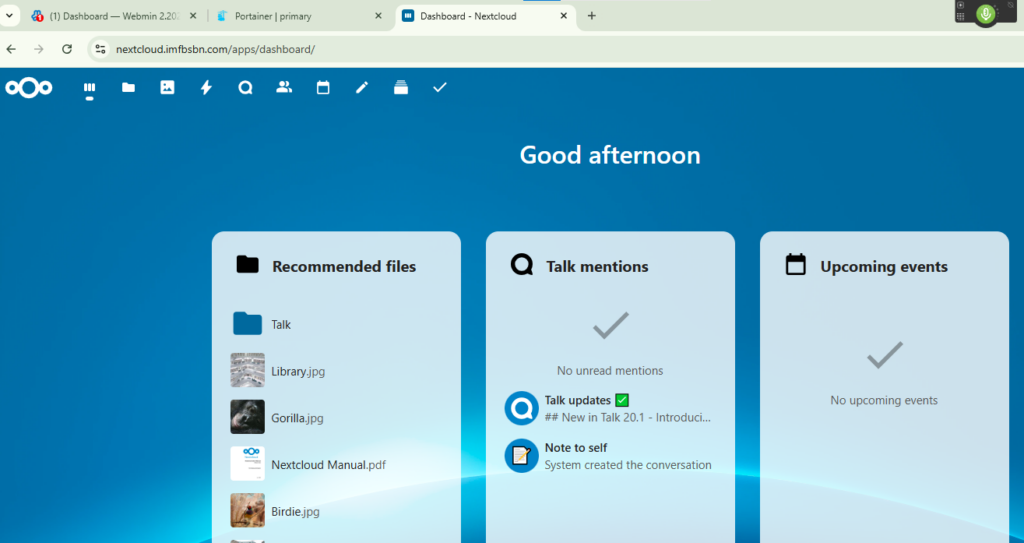
You are going to get a couple of splash-screens the first time you login. Once you get past that you will be at the dashboard.
Congratulations!
You have installed Nextcloud AIO.
In the next post will walk through setting up daily backups and arranging for backups to be moved off the server and into the cloud.