Portainer is an application that helps you manage docker containers.
Now, just so were clear, using Portainer is not necessary. Some of the hard-core-experts (a.k.a. more experienced folk) may tell you that it’s not preferred. I get that. I really do. But in my experience it’s been a very helpful tool for keeping track of what containers are running, what ports they’re using, and examining their logs, all without having to remember a whole bunch of commands.
As always, I highly recommend you review the official documentation at the Portainer website. We will be installing the “community” edition.
To get started we need a URL, or a fully qualified domain name, where we are going to use Portainer. In this example were going to use: portainer.imfbsbn.com.
If you read the previous post about how I setup Virtualmin, you will know that I do not use the DNS features within VM. Just so were clear, VM provides DNS services perfectly. My reasons for not using VM’s DNS has nothing to do with VM. My reasoning is that my domain registrar – a multimillion dollar organization – can provide DNS more reliably than the VPS server I rent for $12/mo.
So here you have a choice:
- If VM is hosting your DNS – if you followed the official setup instructions – then all you have to do is add the domain to VM.
- If you’re like me, and VM is NOT hosting your DNS, then you have to create your DNS records at your domain registrar.
This is me. So this is what I’m going to do first.
I’m going to create the portainer DNS record that looks like this:
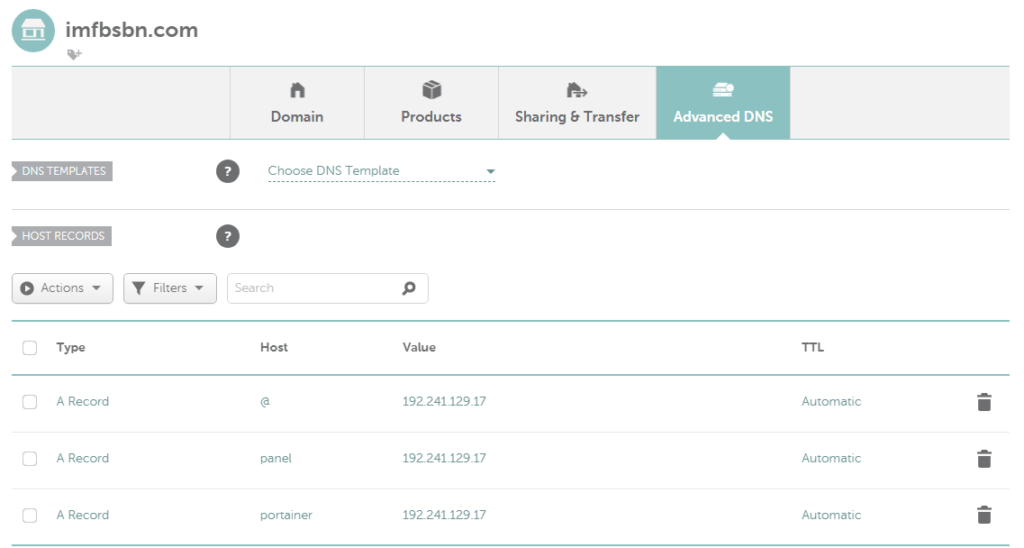
This is at NameCheap. Your registrar’s set up might look a little different.
Once that’s done we are ready to add the domain to VM.
On the left side at the top of the menu click on “Create Virtual Server”. It will open up a window like this:
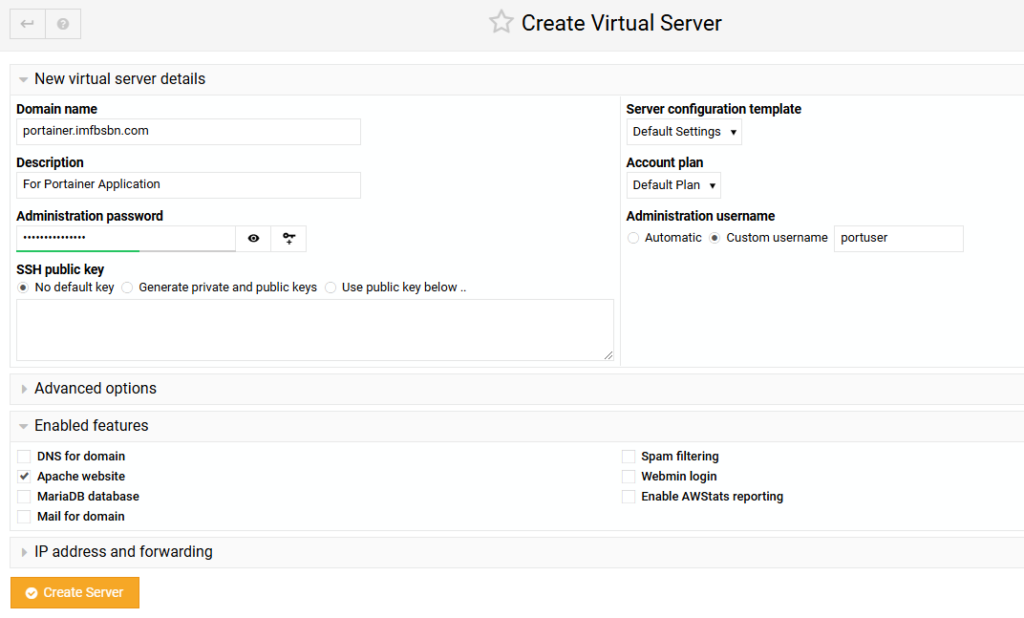
For domain name you want to enter the fully qualified domain name. Description can be anything you want.
As for the administration password, I just clicked on the little key with the + sign and VM inserted a password for me. I didn’t write it down because I’m the only user of the system and I will always be logging in as root. But take note of the username because it’s going to be the name of the directory where you have to create a file in just a minute. So in this case my username is: portuser. We are going to need to know that in a minute or two.
A few changes I did make to the default settings:
- For the administration username I prefer to use something custom over the automatic feature.
- I unchecked the boxes for DNS, MariaDB, Mail, Spam, Webmin, & AWStats because this domain will not use any of those features.
- This domain WILL REQUIRE Apache (as a reverse proxy.) So leave that box checked.
When you’re all set click the orange Create Server button.
Virtualmin will work its magic adding the domain to the server. Depending on your hardware the process might take 1-2 minutes.
When it’s done, click on the blue button at the bottom that says Return to Server Details.
Before we leave the Virtualmin panel, we’re going to set up the proxy forwarding (so we don’t have to come back later.)
Confirm VM is ready to modify the correct domain. It should be listed at the top of the left menubar.
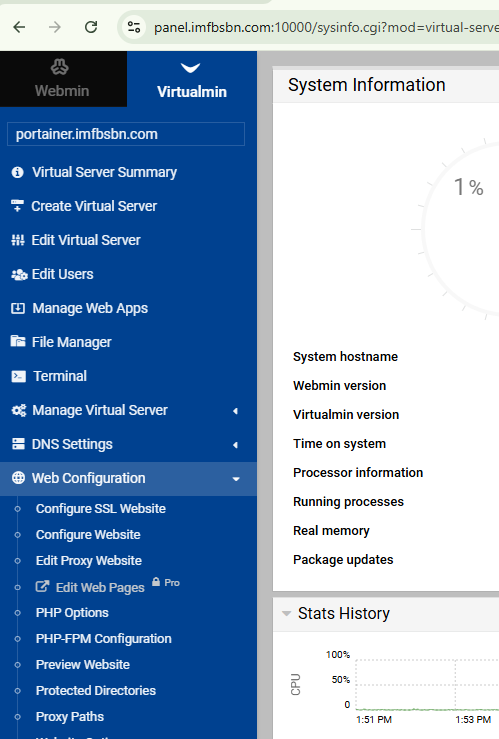
First click on Web Configuration. Then click on Edit Proxy Website.
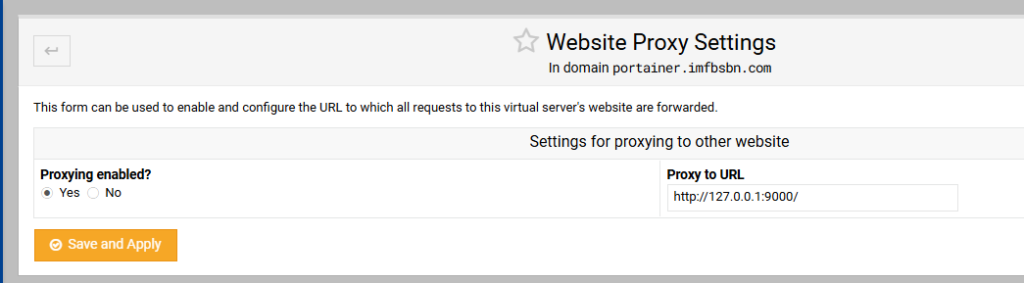
Click on the “Yes” radio button to enable proxying.
Inside the Proxy to URL box enter: http://127.0.0.1:9000/
Click on Save and Apply. And we have done everything we need to do inside Virtualmin. Seriously, that’s it.
Now you need to login to your server through the CLI.
Before moving on we need to talk about Ubuntu and the sudo command.
– If you have installed Ubuntu on a piece of bare-metal like an old computer you found in the basement or a Raspberry Pi, then during the installation process Ubuntu will have asked you to create an admin user. That means you log into your Ubuntu server with that username & not root. If that’s the case, then you will need to use the sudo statement before your commands.
– If you have installed Ubuntu on a VPS server like the Digital Ocean droplet we created in a previous post, when you are likely logging into your Ubuntu server as root. If that’s the case, then you will NOT need to use the sudo statement. Although, while older versions of Ubuntu used to scream at you, it appears the current version just simply ignores the sudo if it’s not needed.
Going forward, I’m just going to assume you’re logging in as root.
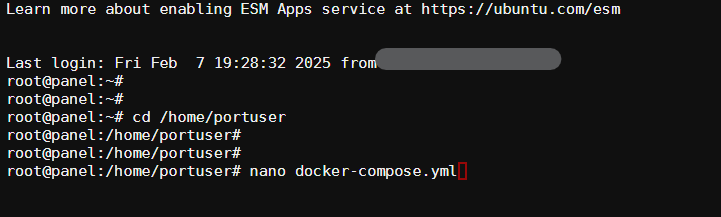
Navigate into the directory of the user you just created which in our case will be: /home/portuser.
cd /home/portuserIn this directory we need to create a docker compose file. Will do that using the nano file editor.
nano docker-compose.ymlBefore you press enter (to execute the command and open the nano editor) your screen will look something like this:
Now you want to cut-and-paste the following into the nano editor:
PRO TIP: in most SSH clients Ctrl-V will NOT work to paste. Use a right-mouse-click to paste.
services:
  portainer:
    container_name: portainer
    image: portainer/portainer-ce:latest
    command: -H unix:///var/run/docker.sock
    restart: unless-stopped
    ports:
      - 9000:9000
    volumes:
      - /var/run/docker.sock:/var/run/docker.sock
      - /home/portuser/pcdata:/data
Inside the nano editor it will look like this:
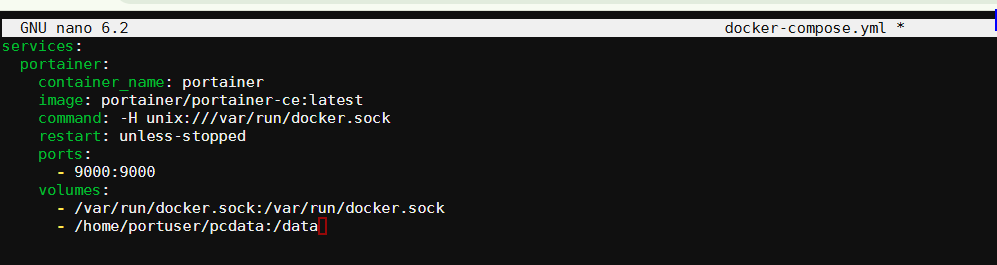
To exit the editor press Control-X. It will ask you if you want to save your work. Press Y. Then it will confirm the file name. You can just go-ahead and press Enter.
Now, let’s go over what each of these lines is doing.
- services: | this is essentially telling docker that it will be executing service as opposed to running a command or dealing with the network.
- portainer: | this is the name of the service that’s going to be executed within docker.
- container_name: | this is going to be the name of the container within docker. A single service may contain several containers.
- image: | specifies the code source from Docker Hub.
- command: | this is literally a command that is passed to portainer when the application is started. This command connects portainer to docker.
- restart: | tells docker if this container should be restarted if docker discovers it has stopped.
- ports: | provides docker with the ports used to communicate with this container. The first number is the system port; the second is the docker port.
- volumes: | similar to ports, this provides mapping between the raw OS and docker. In our case here we want to map /home/portuser/pcdata – which is a folder we know will get automatically backed-up by VM (see post on automatic backups) to the folder /data which exists inside the container. Doing it this way, if the server ever crashes we have all of our portainer data backed up for easy restore.
One last command to run.
Into the CLI type:
docker compose up -dBefore you press enter – be aware that a timer will start to run where you have about a minute to navigate to: https://portainer.imfbsbn.com/
This is because when portainer first launches you will create the admin user and its password. So be prepared.
NOW, go ahead and hit the enter key and then navigate to the website. Note that you do NOT need to include the port number in the URL.
When you run the command in the CLI, you should get something like this:

When you visit the URL you should get this:
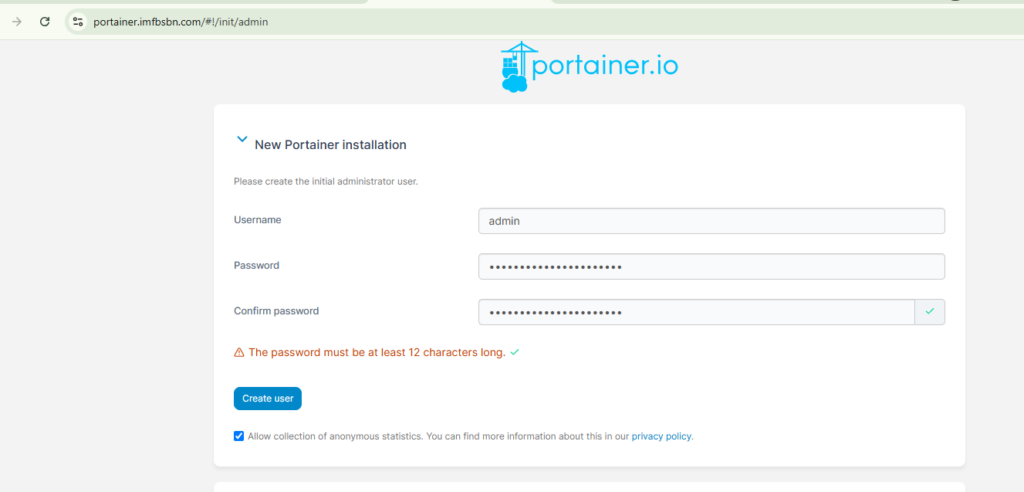
Go-ahead and create your administrative user. You can choose any username and password you want. Then click the Create User button.
You should get taken to the Home screen. You will see on this machine we have a “primary” installation of Docker. Go ahead and click anywhere in the primary box.
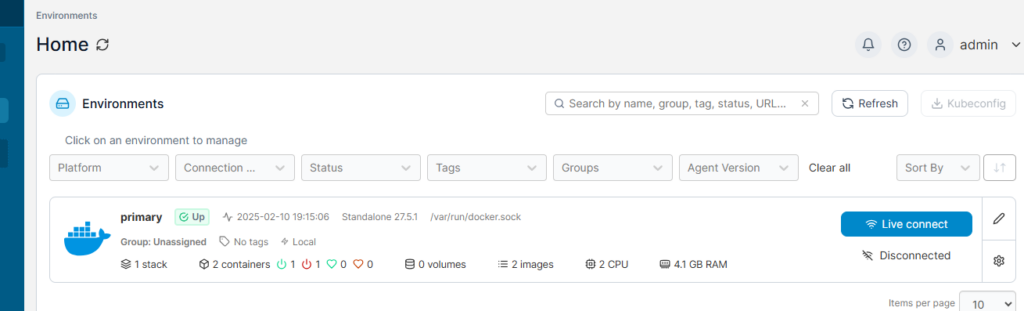
Clicking inside the primary box will take you to the dashboard for that Docker installation. (No screenshot of that!)
On the dashboard, click on “Containers”.
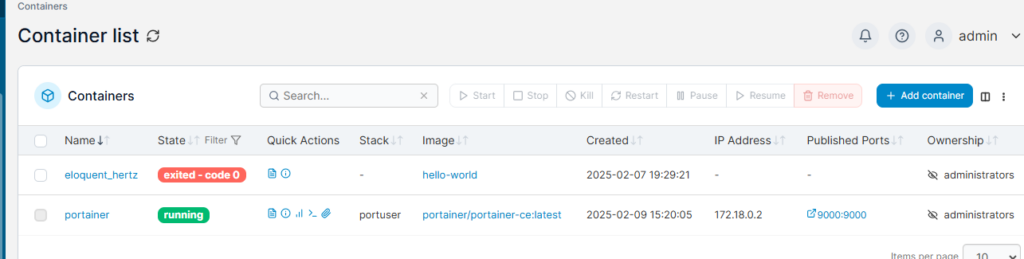
Here you see a listing of all the Docker containers loaded on the system and their status.
Congratulations! You now have installed portainer.